Aircraft Flight Instruments
...The leader in aircraft engine data management systems.
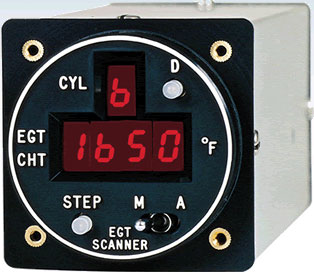 The J.P. Instrument manufactured Classic Scanner is perfect for any plane. The Classic scanner is a small convenient package with an even more convenient price tag.
The Classic Scanner has been in the market for over 20 years, and its reliance and durability is the best in the market. Easy on the pocket, easy to install and use, the large red LED display also make it very easy to read in all conditions. The Classic Scanner is flawlessly accurate. The Classic Scanner scans CHT and EGT temperatures (in degrees Fahrenheit or Centigrade), and both include alarms. The Classic Scanner is paired with JPI’s famous super accurate fast-response probes. The Scanner is FAA TSO approved (Aerospace Standard AS 8005 and RTCA Documentation DO¬160A) and comes with a one-year limited warranty. The accuracy of the Classic Scanner comes from its 3-times-a-second scans of all the probes connected to it and, it can accept up to 16 probes. How does the Classic Scanner work in aircraft? Once properly installed by a qualified aircraft maintenance engineer, the Classic Scanner can automatically display TIT, EGT, OT, and CHT and even, OAT. When the TIT option is installed it (e.g. a 6-cylinder engine would display TIT in EGT scan position 7), OT in CHT scan position 7. To select voltage option simply press the step switch. The CYL digit is the cylinder number of the temperature currently displayed. In the EGT Monitors / CHT display a 4-digit value is an EGT whereas a 3¬digit value with small leading ‘c’ is the CHT reading. The pilot can switch between automatic or manual operation via the mode switch; ‘A’ for automatic mode and ‘M’ for manual. In auto mode the Classic Scanner will index through each measurement approximately every 4 seconds. The Classic Scanner has a ‘dimming’ switch placed at the top right side of the scanner. It is a two-state button and each press alternates between bright and dim. The field programmable switch is located in a hole on the bottom of the instrument case near the front bezel. Turn the Scanner® on and place a small slotted screwdriver into the hole and rotate it until it aligns with the switch slot. Clockwise rotation increases the number channels scanned up to 8. This can be verified by turning on the instrument and noting the initial cylinder number displayed. You can alter the indexing rate (when in ‘Automatic mode’) by using a small slotted screwdriver through hole below the CYL raised letters on the front panel. The control will vary the indexing rate from fast (1.5 sec) to slow (9 sec.) through ¾ of a turn, clockwise. The visual alarm in the Classic Scanner is pre-set at 450°F (for CHT) and 1650°F (for TIT Probes). The alarm consists of a flashing digit. Pressing the STEP tells the instrument that you have noted the alarm and it will resume the scan. However, the instrument will continue to stop on the out of range readout until the temperature falls within the normal range. Please visit the url for more information on the J.P Instrument’s Classic Scanner: https://www.jpinstruments.com/shop/classic-scanner/
0 Comments
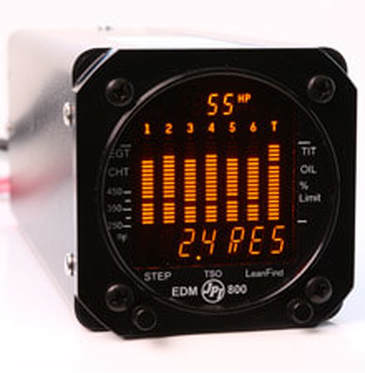 The EDM 800 puts the fun back into flying because as a pilot, you don’t have to spend bulk of the flight time staring at a bunch of dials to ensure the aircraft engine is functioning normally; the EDM 800 does this task for you.
Using the latest microprocessor technology, the EDM 800 monitor up to twenty-four critical parameters of the aircraft engine and it does this four times a second. Superior to the EDM 700, the EDM 800 includes fuel flow monitoring and a host of other features. As before, leaning is accomplished automatically using the Lean Find procedure. With the EDM 800 you have more engine diagnostic information available. In fact, the EDM 800 records, all 29 functions, every 6 Seconds. Its memory can hold up to 25 hours of data. The pilot can also opt to record data every minute in which case the memory will hold 550 hours of data. This data can be downloaded via the optional USB port. The all new EDM 800 provides you with a full-time in-flight readout of aircraft engine horsepower – this helps the pilot achieve maximum engine performance. The EDM 800 converts your RPM manifold pressure outside air temperature and fuel flow into horsepower. To achieve this a small one-time calibration is required. The details are in the instruction manual and easy to follow. Features of EDM 800 include: - 24 Programmable alarm limits - No hassle, front panel programming - Small 2 ¼” installation foot-print - Lean Find finds the first and last cylinder to peak with true peak detect. - Displays both leaned temperature below peak and peak. - Designed for use with a single 6 cylinder engine with Fuel Flow Instruments. - Battery voltage with alarm - EGTs to stable 1°F resolution - DIF low to high EGT with alarm - User selectable index rate - Shock cooling monitored on every cylinder - Non-volatile long term memory - Records and stores data up to 30 hours - Post-flight data retrieval - FAA Approved as primary temperature instruments for CHT Probes, OIL, TIT Probes, RPM, MAP, Fuel Flow - Fuel quantity in pounds, gallons, kilograms or litres - Low fuel quantity alarm - Low fuel time alarm - GPS interface-Instantaneous fuel flow rate - Total amount of fuel consumed - Total fuel remaining - Time to empty at the current fuel flow rate All of JPI’s EDM’s are TSO’d for Quality For more information please visit: https://www.jpinstruments.com/shop/ed-800/  Data from the OAT probe on aircraft can be used in several calculation such as flight planning, aircraft take-off performance, cruise performance, density altitude and so forth.
In modern day aircraft, external air temp obtained via the Outside Air Temperature (OAT) probe, for the basic input for air data computers. There are two things to be kept in mind; one, the Static Air Temperature, or SAT, i.e. the temperature of the undisturbed air through which the aircraft will fly and second, the air temperature as the aircraft flies through it. This latter temperature is always a bit higher than the former (dur to kinetic energy is converted to heat at the sensor). Although the OAT probe in aircraft is important, most pilots / owners of aircraft tend to ignore it. OAT data is used for recognizing potential icing conditions and in determining such essential parameters as density altitude and true airspeed. Ideally, the OAT probe should be part of the Advanced Flight Systems EFIS package or at least part of any other glass cockpit package, or as a stand-alone gauge in a traditional cockpit. IDEAL OAT PROBE LOCATION: To begin with, the OAT probe should be mounted externally of the aircraft – not in the cabin air scoops, not inside the fuselage and definitely not inside the cowling. You won’t get accurate Outside Air Temperature reading this way. Generally speaking, the probe should be placed away from any sources of heat, and out of direct sun light. A location under the wing, sufficiently outboard to avoid exhaust heat, or on the bottom of the fuselage would be ideal. For single engine installation, avoid mounting the OAT Probe on the side of the Aircraft Engine Sensors. Additionally, for the OAT to function accurately, a sun shield must also be installed. Most OAT have two wires (moulded or unmoulded). One wire would be red – this is the power supply wire. The other wire carries the Oil Temp Probes data from the Outside Air Temperature (OAT) probe to the instrument receiving the information. Remember that the temperature indicated by the OAT probe is the Ram Air Temperature (RAT) so called because the oncoming air as it is brought to rest and compresses at the front of the probe. For those technically included, you can arrive at the actual OAT by using the formulae TAT = SAT + (K × TAS² / 7592) Where: TAT is the output from the probe. SAT is figure to be derived (in Celsius). K is the recovery factor of the probe (usually 0.8 to 0.9). TAS is True Airspeed (TAS) is in knots. For more information purchase, please visit: https://www.jpinstruments.com/shop/oat-probe/ |
AuthorJ.P.Instruments was founded in 1986 in Huntington Beach, California, USA. Its founder, Joseph Polizzotto, is now the current CEO. Archives
May 2019
Categories
|

 RSS Feed
